Pages

Thursday, May 27, 2010

building garden structures

At the end of summer 2008, I build this

I originally built it as a big pot....
my dogs run through everything and pee on everything,
killing plants right and left!
So this was a great way to protect them!
And as you can see, this also a great way to improve the view!

I used this book:
trellises and arbors by Sunset (over 35 projects...)
I followed more or less the directions for:
"raised-bed trellis".
I modified the back as it was too complicated.


It is made of pressure treated wood, mostly 2 x 6, except for the cap
that is made of 2 x 8 for the front, and 2 x 4 for the rest.
So that you can sit on it.
I used only one sheet of heavy-duty (3/4 " thick) treated lattice,
and attached it horizontally to the 4 x 4 posts.
They are 2 feet in the ground, so pretty sturdy!

The overall size is:
7.5 feet x 4.5 feet x 6.5 feet tall

In 2009, all the plants came back after their 1st winter.
All survived, and grew bigger!


We added some climbing annuals from seeds,
and they took over the lattice.


We enjoyed it so much that I built another one,
for the other side of our patio,
a smaller one, without a lattice screen:
it is 7.5 feet x 3.5 feet


One half is lavender, the other roses and lilac.
During the summer, everything grew very nicely


We had a "green wall" between our neighbors!


the smaller also grew but much slower.

But this year, it is doing great,
it is only May!


The lavender is finally happy,
I am excited to have my first harvest!


Yep I will miss our backyard.


Visit thecsiproject.com


Funky Junk's Sat Nite Special

Wednesday, May 26, 2010

Dance outfit

This week end was my daughter's dance recital.
It is her 3rd one,
so she is an old pro!


She loves to get flowers from her brother at the end.
During the show, she just smiled at him, having a grand time.


Some official pictures were taken,
I will post them when we get them!

Last year I made an ballet outfit
for the doll.

Of course it matched better
with the costumes from the previous years!
So I have been told I need to make a new one!!
Little girls and their demands!

I used this pattern
Simplicty 4364.


So I am working on a white and aqua doll costume,
using the same pattern.
I will keep you posted!
Here are some pictures of the previous shows!
Yep she is growing!


Happy sewing and dancing!


Show and Tell Green


Monday, May 24, 2010

mango souffle

Warm mango lime souffle....

It is just delicious!


A few years ago,
a good friend of mine took a souffle class
and she shared her recipes with me.

And on those rare nights that our husbands went to the movies,
we let the kids run wild
and made souffle!

true decadence!


so here is the recipe:
1 cup ripe mango puree (food processor)
1/4 cup sugar
2T. cornstarch
3T. water
juice of 1 line
zest of 2 limes
1 cup mango cubes (about 1/2")
4 egg whites, at room temperature
3T. sugar

Preheat oven at 375 degree F, place oven rack in the lower half.
Prepare mold by buttering generously, then sprinkle with sugar.

Bring the mango puree and sugar to a light boil in a small saucepan.
Whisk the cornstarch and water together in a small bowl.
Add this mixture to the boiling puree.
Whisk until thick (about 1 min)
Remove from the heat and pour into a large bowl.
ass the lime juice, zest and mango cubes.
Set aside to cool.

Beat the egg whites, gradually adding the sugar,
until medium stiff peaks form.
Quickly fold the whites into the mango mixture
and scrape into the prepared mold.


Bake until risen and golden brown (about 40 min)
Remove from the oven and dust with sugar
and a little more lime zest.
Enjoy warm!


and when they say warm...they mean it!
Otherwise....
deflated souffle!!


It also happens if the egg whites get over beaten!

But it still tastes delicious,
just less impressive.

Happy day!


Wednesday, May 19, 2010

doll outfits

Today while I was reading
blogs after blogs
(instead of grading mys students'exams...)
I found this web site
for 6 "retired" American dolls.

Here is the web site description:
"I would like to thank fellow collectors for their time and energy putting together the wonderful patterns. Years ago American Girl Provided patterns for many of the historical characters. Those patterns included the Pajama's and usually two other items along with accessory pieces. The patterns were pretty basic but not always as easy to follow like newer patterns available for dolls from sewing stores. However, they were fun to look through and could provide your doll with some of those pieces to her wardrobe that American Girl no longer carries. Clicking on any of the images will take you to your dolls direct downloadable pattern in a Zip file PDF. Understand that each download may take quite a bit of time depending on your transfer speeds. Each files size is noted."

The girls are:
Josefina (1824, Northern NM)
Andy (1864, Civil War)
Samantha (1904, NYC)
Felicity (1774, Williamsburg)
Kirsten (1854, frontier)
Molly (1944, WWII)

I downloaded the patterns and they seems pretty good.
A lot of details!

Do you remember the dress I made for my daughter?
I had a lot of fabric left,
so I made some short pants for her doll:


I used this pattern,
Simplicity 2761.
It is mostly aprons but the pattern for the pants
is nice and fast.
I just shorten them.

My Maman made the sweater for the doll,
and it matches perfectly the flamingos!
So I had to make a little top!


It is just a piece of fabric, stitched in half with an
elastic for the top and a ribbon, around her neck.
She is ready for some spring adventures!

Happy sewing!


Thursday, May 13, 2010

kitchen

Here the kitchen we got when we bought our new house.
It was big and bright
but not the best quality!

I apologize for the mess, just normal state at our house!

We first had to buy a fridge since the previous owners left with their!
But already it was an uplift!


Shortly after that I changed the handles everywhere.
Then we had to wait....
until our previous house was sold!
It took almost a year
(we rented it in the meantime, but it was not the same)

We finally were able to purchase new appliances:
a stove with a convection oven, with
 a flat cooktop (no more uneven heat)
and a dishwasher that actually washed the dishes
(the swearing level dropped dramatically after that!)


So here was our kitchen after 1.5 years.
Still the same cabinets with not efficient storage and
 dangerous drawers.
And same level of mess!


After going many times to our local IKEA, we decided
to redo our kitchen ourselves!
Doing on a budget, one section at a time!
Less overwhelming and less money at once.

So we started with the corner.
That little countertop would always get all the mess,
so it disappeared!


Voila!
Clean and modern and plenty of storage!


We waited a few weeks, and then
we removed  the top cabinets!
The new day, we learned that my husband's position was in jeopardy!
Talk about stress!!!


By then the backsplash was gone and there was no going back!
We installed the upper cabinets.


We waited there for quite some times,
wondering what to do.
The kitchen was half done,
not ideal to sell a house!


His situation got a little better,
so we decided to carry on and to make it work.
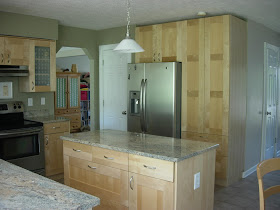
The island was next, it is much bigger
and with a lot of storage, great for pots and pans.
We reused our old countertop!
(for a few months!)


Then we waited, wondering which countertop to purchase.
Laminate to save money or
granite to keep up with the neighborhood?
I spent a lot of time at Home depot and Lowes
and local countertop places,
pricing out options.
My local granite supplier made me a great offer
and we ran!
It was slow season for him, and
fast pace for me!
We had to install the bottom
cabinets in 2 days!


and there it was!
Finally it was coming together!


We did not install the countertop,
the pro did it (not easy at all!)
but I love it! 
True joy!


By then it had been over 9 months since we had started
and IKEA was changing its color and style!
So I was able to get the last few cover panels and details I needed.
Of course I also needed to repaint the kitchen
as the previous color turned pink with the wood color.
We chosed a beige-green (depends on the light!)


And there it is, almost done.
We decided against a backsplash.


We added a picture frame above the stove,
with 3 pictures of olives.
(the middle one is from here)


I must say I love it!

so here it is
before


and after


Happy day!

PS Mon cheri's situation is resolved!
He had to find a new job.
We will be moving soon!
I hope all our work will please potential buyers.


Furniture Feature Fridays

Funky Junk's Saturday Nite Special