Tuesday, September 28, 2010

holiday cards

and I said Halloween was coming up!
Well I was interested in taking this vintage holiday card workshop
 at Archiver's, and it was almost all filled up, with 3 months to go!
So I went, and it was fun!

Here are the cards I made:


it was all about layers and distressing,


with a few techniques that I did not know...


and of course embossing, and glitter....


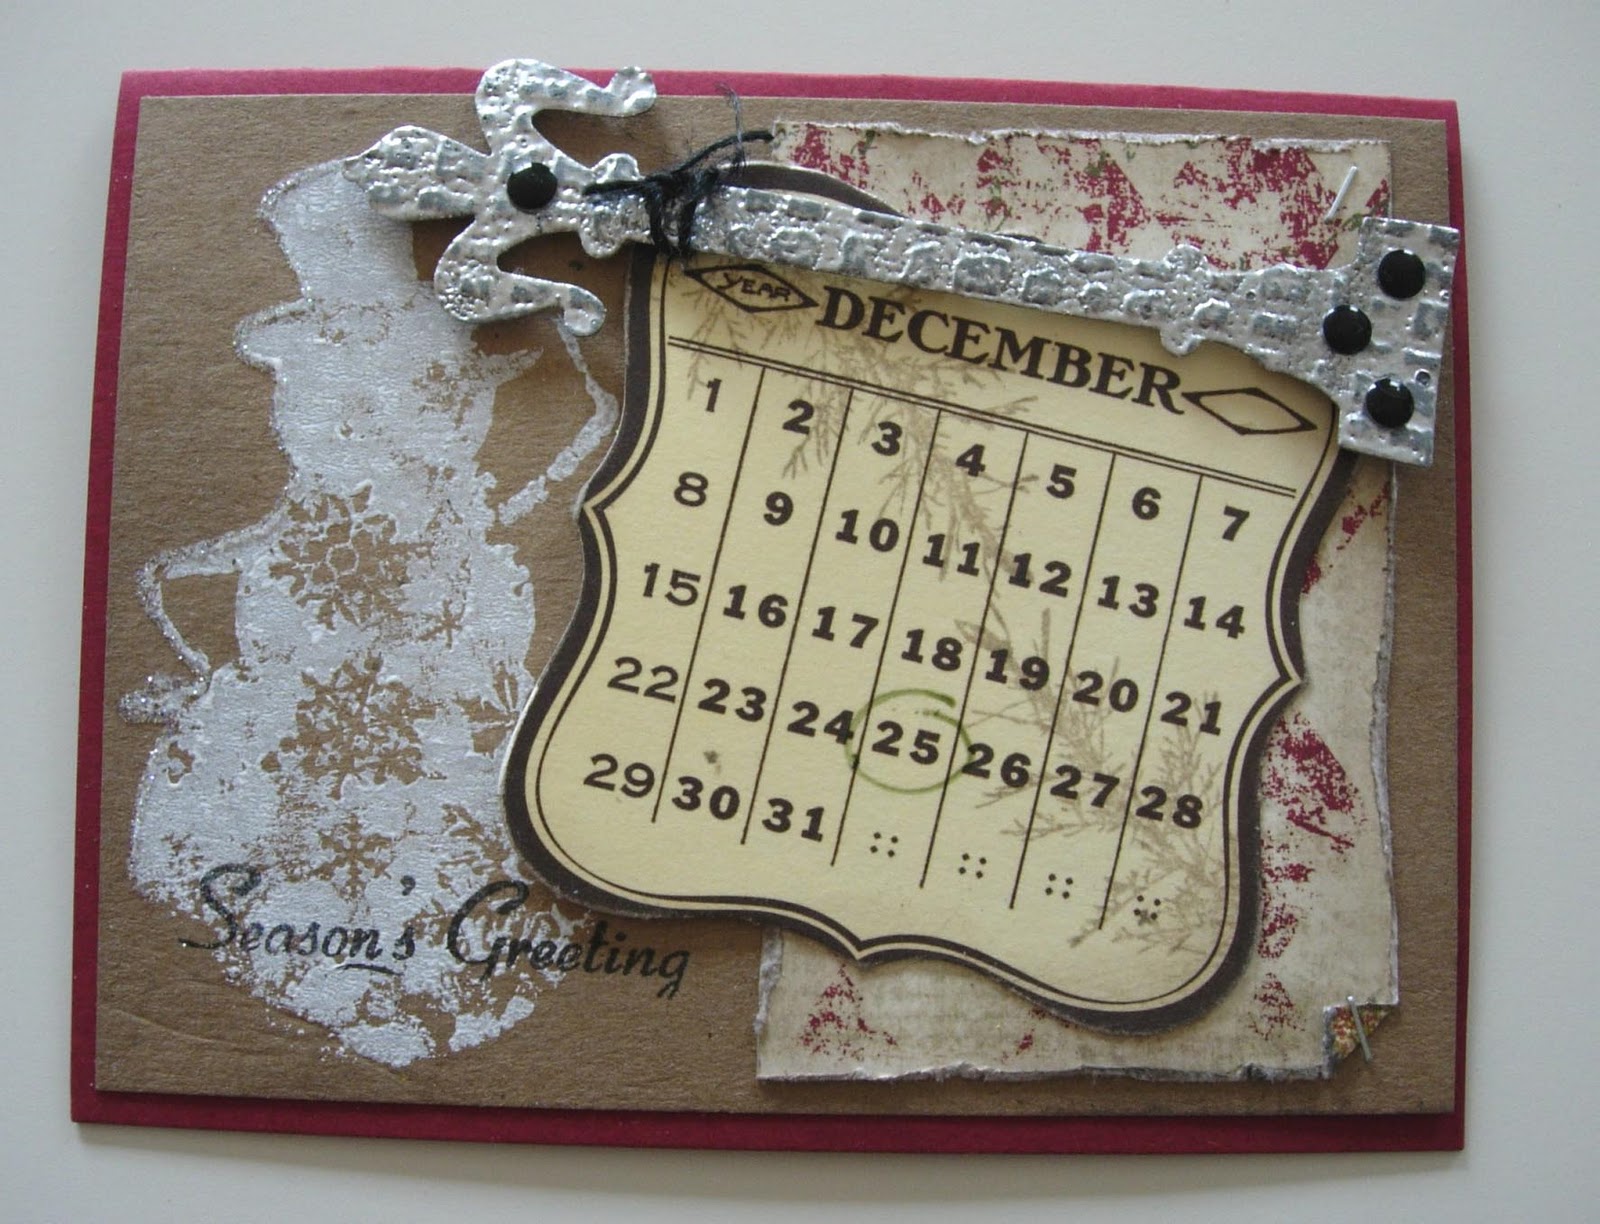
these are holidays cards, so totally appropriate!


I also made a tag, quite distressed but fast to make!

The class was long, over 3 hours,
 I usually work fast, but I needed all the time.

Of course I had to get a couple new toys,
since there were a few new techniques,
there were new things to play with!
So I got a paper distresser (like a rotary blade but protected)
to alter, aged paper.
Probably safer than plain blade, after all,
Miss C. always helps me in my craft, I do my best to keep her safe!


I also purchased a glue pen, very precised and
 perfect to outline details with glitter.

I cannot wait to go play some more,
but no way I am making dozens of these cards!

Happy crafting!


Monday, September 27, 2010

ballet slippers bag

Miss C. has started her 4th year of ballet and 3rd year of jazz.
She just loves dancing, and she seems good at it,
especially free dance!

To go back in style, I made her a new bag.
She saw the one made by Dana of Made,
and wanted a similar one.


So I did!
For the color I was inspired by "Gentlemen prefer Blonds",
when Marylin sings "Diamonds are the girls' best friends":
hot pink and black!


I pretty much followed  Dana's tutorial,
I changed the string as mine is only on one side.

Ready, set, dance!


Happy sewing!

PS: we got the result of her audition for the Nutcracker,
she will be one of the tiny mice, the part she has dreamed of
for the last few years! Cheesy costume, tail and ears,
it does not get any better!

Happy sewing!


Saturday, September 25, 2010

witch costume for doll

With Halloween just around the blog corner,
it is time to dress not only
little girls and big boys,
but of course, our favorite dolls!

For me, growing up in France,
Halloween was all about witches,
well my kids never ever wore a witch costume!
So this is the first witch costume I made:


I used this e-pattern from You Can Make This
and their free hat pattern.

The corset was fun to make, with ribbon and
different color fabrics. It closes with velcro in the back,
so little fingers friendly!


I did not make a skirt,
she just wears the chemise, made with
the same fabric than the hat.


I have used this pattern to make dolly night gowns,
with longer sleeves, like here.


Happy sewing!


Texas Monkey

Show and Tell Green

Thursday, September 23, 2010

fall is here

and it is over 95 degree!
But there is something in the air,
just how cool the wind is in the morning,
the dogs and I enjoy it in our daily walk.


This week end, we will be going to the applefest
in Lebanon, Ohio.
We went a few year ago,
we ate everything apple:
doughnut (delicious), pie (of course)
and a new treat for me: apple butter!
It does not exist in France, I became a fan really fast!

To celebrate fall, I am making paninis,
not especially fall food,
but I just made a lovely pesto using this recipe 
(without garlic of course!).
Bread is always a comfort food,
actually it is more like an essential!


Just bread, pesto, tomato and cheese,
true happiness!

Happy Fall Day!

Monday, September 20, 2010

renaissance outfit for doll

As I really enjoyed going to the Renaissance Fair,
and dressing up for it,
I figured the dolls would too!


Remember my " historical dress",
well I tried again!

for the skirt and chemise.


There is a simple tone on tone embroidery around the yoke.

For the corset, I used some pseudo leather
a pattern from You Can Make This.


I simplified it to make it look more realistic.

I also made some shoes with the same pseudo leather,
using this free pattern.


I think it turned out nicely.
I sent it to a young lady, that seems quite happy with it,
which always the best part of making doll clothes,
the play time!
Well besides mine!


PS: do you want to see me in my Renaissance outfit?
Well you will have to wait as I have packed all of my costumes
to show the house less cluttered ...
I know: so sad!
But the doll and I have the same outfit in the same color!
She is just prettier!

Happy sewing!

Sunday, September 19, 2010

fall decorations

Do you remember my son's dilemma
over the acorns that we collected for my fall sign?

well I found this cute tutorial on how to make acorns!


Yes I will not have to hear how we are hurting nature
and all the animals that eat the acorns!
I will still need the top part of the acorn,
but I am quite sure most creatures do not eat that part!
(I do remember my grandfather feeding acorns to his rabbits!)

While I was at it,
I also made some fabric pumpkins,
too easy and too cute to pass.


I used this tutorial.
Basically it is a rectangle (twice the width for the height),
stitched on the side and gathered on both ends.
The key part is using some floss to shape the pumpkin.


I started with a 6 x 12 rectangle for the big one, and
a 4 x 8 for the little one.

I put all of the fall decor pieces on my fall table setting,
the little porcelain tray needed some thing!


Happy sewing!

Friday, September 17, 2010

late summer doll clothes

I found a cute pattern
for a doll dress on the blog of oliver + s.


it is similar to the one I made for Miss C.


So of course I used the same fabric!
I also made a simple headband by sewing
a rectangle (14 x 2 1/2) in half, adding velcro for easy closure.


I also added a little flower made from the blue fabric.
And since I had some more leftover,
I made a cute outfit for Barbie,

using this tutorial for the top,
It was fast and easy,
very rewarding!

Then I kept on going and
made, with still the same fabric,
a little top and pant
for a baby doll!


The top is made using this pattern/ tutorial,
the bottom is from a old pattern no longer available.
The top is reversible, so 2 looks with one top.
I used white snaps to close it, they are finished on both sides,
it looks good on the blue or on the peach side!

Happy sewing!

Thursday, September 16, 2010

chocolate cake

Miss C. has been requesting some more cake,
play food cake.
I had already made 2 cakes,
but it was not enough!


So this time I made a cake she can "cut"
and serve individual pieces.

I started with 2 inch foam,


drew a circle with a plate, and marked 6 pieces.


I cut the 6 pieces with a bread knife.

I cut a 2 inch band of brown felt


and wrap the cake, cutting it to length.

Then I stitched it at the pointy end, the middle of the cake.


Using the same plate,
I also cut top and bottom of the pieces of cake.


and stitched all over the top and bottom.


It was looking like a nice cake,
but very plain!

So I added some whip cream,
following this description.

I also added 2 bands of lighter color felt,
to replicate the actual cake that was not covered in icing.


I think it worked quite well,
and she seems happy!

Happy sewing!


Tuesday, September 14, 2010

fall table

For the past few months,
the table is set in our dinning room,
so it looks inviting for potential buyers.

As the season is changing,
I transformed it from summer to fall.


Since we are not formal people,
I made a simple tablecloth, a runner and napkins,
with fall color and a more modern twist.


For the table runner, I used outdoor canvas,
not for its properties but because I just love the design and colors.


I just cut a big rectangle out of the canvas and another fall cotton,
stitched them ride side together, leaving an opening,
and after turning right side out, it was top stitched.
Because of the weave of the fabric,
the stop stitching is not as pretty as I would have liked it.

For the tablecloth I used everybody's favorite:
painter's dropcloth!
I first washed it and cut off all the hemming.
Then I cut it to size, and stitched all around it with a wider hem,
mitering the corners


The fabric for the napkins is also a little heavier than usual,
as it is also a drapery fabric (100% cotton), purchased at Hancock Fabric.


I mitered the corners of the napkins too,
it is a detail I always look for when I purchased then,
so I cannot ask less of me!
(even if it does take a lot more time than a regular rolled hem!)


I found these cute place card pumpkins at Michaels,
and I just had to add them!
(There is a better and a lot more expensive version at Pier I)


I used some fall paper to make a pre place card,
I will add a white piece of card stock with the name on top (smaller than the fall paper)
as we have guests!

Before:


After:


Now, what's for dinner?

Happy sewing!


Visit thecsiproject.com


Photobucket

Christmas crafting: it was a busy month!

This December was very busy with a lot of crafting, sewing, quilting, baking. I found it easier to share on Instagram (not something I thou...