Thursday, July 26, 2012

homemade goody bags

To go with our safari birthday party,
we needed special goody bags.
After seeing our invitation,
I am sure you can imagine that I made them!


Here you can see them all together waiting for the girls to take them home.

There are 2 different versions: one with ribbon handles
and one with fabric handles.
I have been making these little bags for many years (about 10 years),
I made smaller version for Halloween when my kids were in day care!


These ones were quite large, about 8 1/2" by 5".
To keep with the safari style, I used drop cloth for the body of the bag,
it has great texture and is sturdy enough to hold its shape,
a piece of animal print cotton (this one was twill)
and some unbleached muslin for the inside

For each bag, we need:
6 1/2" X 19" drop cloth and muslin
2 1/2" X 19" print


I folded under the long raw edges of the print, about 1/4"
and pressed it with an iron.


Then I appliqued it onto the body of the bag, about 1 1/2 inch from the top,
stitching 1/8" from the edges.


With the ribbon handles, I just cut two 10" pieces of ribbon.
With the fabric handles, I cut a 2 1/4" X 20 piece of print, folded in half right side together,
stitched 1/4" from the edge, turned it right side out and cut it in half.

In either cases, I pinned the handles to the top of the bag, about 1 3/4" from the edges,
and 1 1/2" from the middle (1/4" because of the seam).


I pinned the lining to the top of the bag,
and stitched all the layers together,
I used a 3/8" seam, the rest of the seams are 1/4".


I then pressed the lining and seam away from the drop cloth part of the bag.


I folded the bag in half right side together, muslin on top of muslin,
drop cloth on top of drop cloth,
and stitched all around it, leaving an opening on the muslin part of the bag.
I like to leave the side opened instead of the bottom.


While the bag is still wrong side out,
I stitched the corners to make the base wider.
I did on all 4 corners, the seam is about 1.5" wide (blue line),
and cut the excess fabric.


I finally turned the bag right side out,
and slip-stitched the side of the bag.
Then the lining was placed inside the bag,
and both layers were top-stitched together.


So what kind of goody did I place in it?
Well not so much, I figure the bag is already a goody!
Girls always love to play with bags, and put lot of things inside...

The girls found inside 2 different kinds of chocolate,
a cheetah pencil and a safari style bandanna that they were during the party.
They seemed happy!
One of the girls could not make it, so Miss C. has one,
she is definitively happy!


Happy sewing!


Wednesday, July 25, 2012

birthday invitation

we needed some special invitation,
homemade of course!


We looked around Pinterest
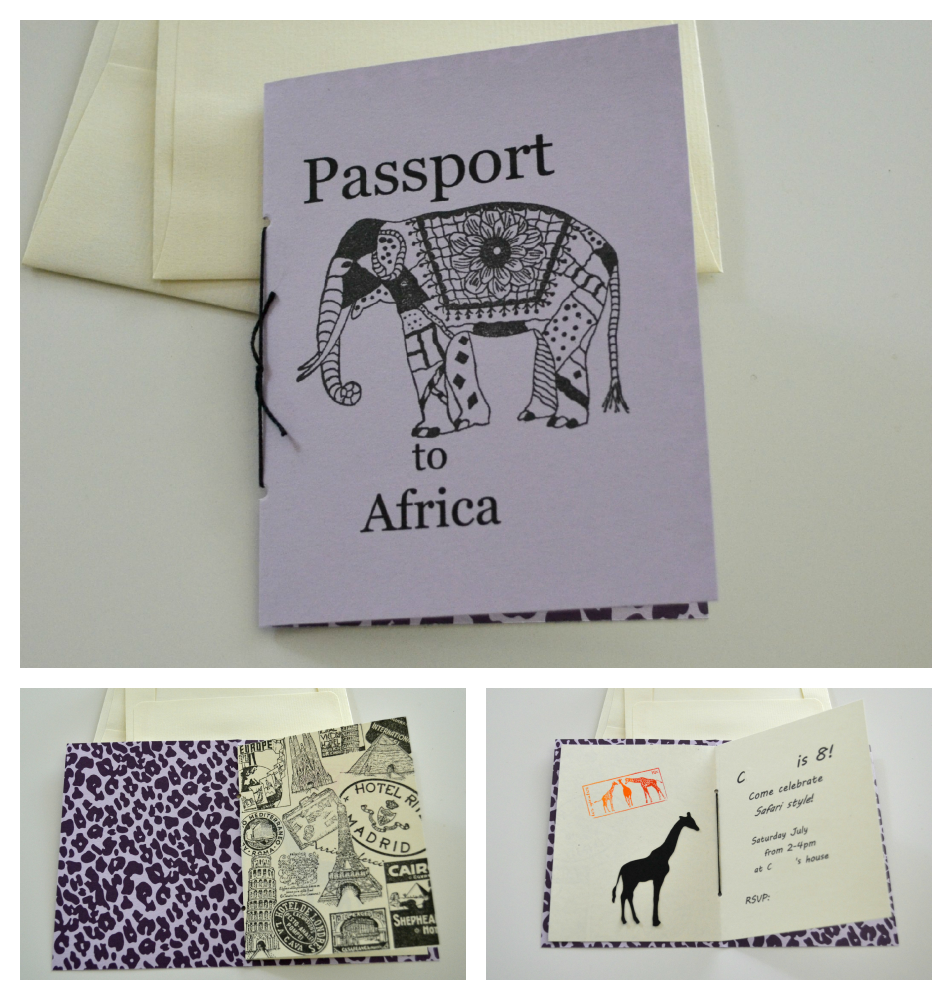
and found Passport invitations are all the rage,
so we went with the trend!

Using the computer, I wrote "Passport to Africa" leaving enough space
to stamp our beautiful elephant (probably Indian, but good enough).
We printed on the reverse side of this purple animal print cardstock.
Afterward, I realized I should have done a better job centering the print!
The automatic border of the page messed it up a little,
but it did not disturb Miss C. so we kept going with our project.

We cut the paper (we made 2 passports per sheet of paper),
and stamped the elephant (Magenta) in black ink.


When the passport is opened, the print can be fully appreciated!
For the inside, we used an off-white cardstock, folded in half,
and cut a little smaller than the cover.

We stamped the cover with a travel stamp,
resembling what would be stamps from various countries,
after all our guests were world travelers!


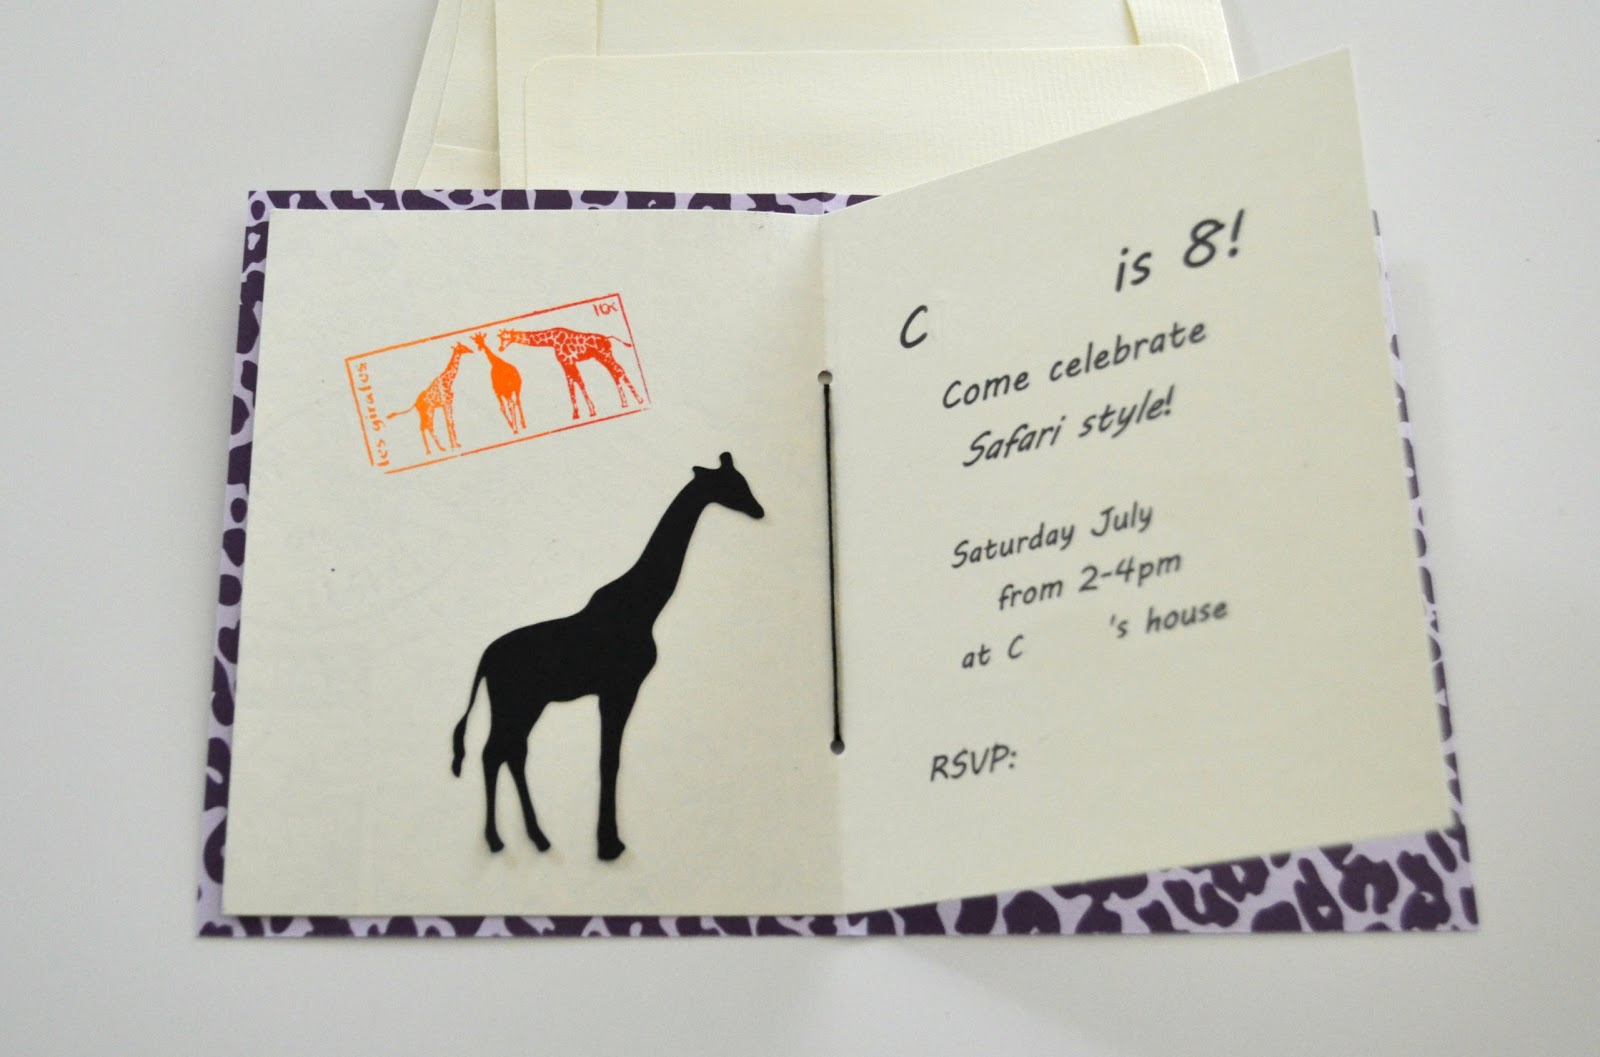
On the inside we printed the information about the party
(I have removed most of it, for privacy reasons)
We added some colors with a giraffe stamp,
and a cut-out giraffe 
(same animal that we used to decorate the cupcakes)
We left the rest of the pages blank.


To attach all the pages together, I used a small hole puncher,
and with both layers together, I punched 1/2 holes on the edge.
Then with black embroidery thread and a big needle,
I tied a knot on the edge.

Miss C. was very proud of her invitation, 
she kept saying it looked like they were store bought!
I love her enthusiasm,
I guess having her involve in the project makes it that much more special!


So I will not start any time soon making professional invitations
(not that I was planning on doing it!)
but I am pleased with how they turned out,
and more importantly that all of our guests enjoyed receiving them!
Have you ever made your own party invitation?
Any tips for next time?

Happy day!

A Crafty Soiree

Tuesday, July 24, 2012

birthday party: safari style!

Last week end, Miss C. celebrated her birthday with her girlfriends,
her request: it had to be animal related, her passion.
So we came up with the idea of a safari,
I had "Out of Africa" vision,
she thought hot pink animal!

Here is how we compromised:


A perfect mix of wild print with strong color and more neutral decor!

The best part is that we had most of the element already,
no need to purchase fancy things, besides loads of candies and treats!
A fair amount of shuffling around was done: the picture is from our bedroom,
the buffet cover is the curtain from the living room (drop clothes are so convenient!),
the wood animals are from the dining room (most come from far away trips)
the tray is also from the dining room.


Miss C. came up with the idea to use ribbon to decorate the ramekins that hold the candies,
she just used tape to secure it around the base.
Brick Master was also helpful, he was in charge of naming and creating all the tags
for the various treats, some of names:
coconut juice, fruit, snakes, worms, monkey slices, flowers, snake eggs, elephant ears.


We used the memories slice to cut all the animal shapes,
and he used a mini alphabet stamps set to write the names.


We used the same tools to make cupcake toppers
for the vanilla cupcakes with home-made chocolate icing.


I made a simple layered cake (yellow cake with home-made vanilla butter cream),
 I used some tattoo from Charm City Cake, it was perfect for our theme,
and surprisingly easy to use. I was a little concerned but it went well,
I made the cake the day before, iced it a few hours later, refrigerated overnight,
and applied the tattoos the following morning, pipped some more icing to hide the edges
and called it good.
The girls were very surprised and happy!


Doesn't it look nice?
Nothing says Happy Birthday like 4 layers cake!


The table was very simply decorated:
Miss C. used her collection of animals to make
a circle of life. 
We had purchased wild print plates (with lime green rim!)
The chair of the Bday girl was recovered in a cotton print with animals (secured with tape!).


And finally the back table with the goody bags
and space for the gifts.
I made the quilt many years ago for the kids'room,
and it looked perfect for the party.


It was one fancy party
and the birthday girl just loved it all!
It is official, my baby is 8....


Happy Birthday Miss C.!


Sunday, July 22, 2012

vintage French wine tray

A while ago I saw a great magazine tray from Shanty 2 Chic,
and of course I had to make one.


Wanna come over and have a drink?
The tomatoes are from the garden and the cheese is French of course!
(so is the wine, but it is not a requirement!)

The final product looks different from the original, it would not have fit our decor,
but the wood base and corner/handle details are the same.
I chose to finish mine with a darker stain
and I used this typography from the Graphics Fairy DIY.


I used a different technique than most people use.
I printed the reverse image with a laser printer on shelf paper (contact paper)
and ironed it onto the wood.
It is a little tricky but the plastic ink from the laser printer transfered beautifully.

*Update*
I received a lot of questions about the transfer so here are a few more details
(I will do a proper tutorial if somebody needs more details)

Here is the tutorial 

I used a roll of contact paper, simple off-white from Home Depot (cheap, and plain).
I cut a piece the size of a sheet of paper 8.5 X 11, making sure there are no wrinkles.
I taped on all sides to a piece of card-stock, regular paper is not sturdy enough.
I printed from a laser printer the reverse image.
I removed the tape and card-stock, but left the backing that came with the vinyl contact paper.
I positioned the image where I wanted it and taped it onto the wood to avoid any shifting.
With a hot iron, I pressed it on the wood.
Because the base of the tray was uneven, it was hard to iron flat.
So I used a mini-iron : the clover II mini iron, with it I was able to press hard and precisely 
over the detailed image.
I lifted the paper as I was ironed it to check the transfer, just like I do for a rub-on image.
In a couple places, the contact paper got too hot where I had no ink and slightly melted,
 but I was able to remove it by scratching gently the surface.

If for some reasons, the transfer is not perfect, the wood can be sanded and reused.


Doesn't it look like it comes from some old wine box?
And it is possible to stain afterward, here I used a mix of 2 stains
as I did not have the color I wanted.

Then I spay-painted the same metallic corner pieces that Whitney used,
 also the handles. I screwed all of the pieces in place
and touch up the screws with the same spray paint.
I sprayed some paint in the cap ans used a Q-tip to apply
on top of the screws.


We have been using this tray for the last few weeks,
as a tray and as a decorative accent,
it fits both needs perfectly,
and all for less than $10!
(half of it is for the corner pieces and handles!)


Happy day!

The Graphics Fairy

Skip To My Lou

Visit thecsiproject.com

Thursday, June 28, 2012

fence

When I was working on updating the patio,
I mentioned that I was working on a few projects.
Well, Mon Cheri and I built a fence to keep our puppy
in the backyard, Black dog and GBD always knew the boundary
and never needed an actual fence (they had been trained in our previous houses
with electronic fences and knew what those little white flags meant!)


It took us a while to build and install it, but here it is,
all finished and keeping the puppy and Black dog inside the yard.

To make the work go faster, I build sections ahead of time.


I used pressure treated 2 X 4 for the top, and 2 X 6 for the bottom.
Like that I could build during the week, and we could install on the week end,
it worked really well. I also had enough time, for some of them, to paint them before installation.

For the posts holding the sections,
we followed this description from This Old House.
I did not do the digging, carpal tunnel and digging do not go together at all,
I manage just fine with just about everything else in small dose (except knitting too!)

Since we "only" had 2 sides to build, we also needed 2 gates.
If you ever build door or gate, you know these are the tricky parts,
well I was able to find those kits at the Home Depot,
and they were perfect for our fence: easy to install and sturdy.


They worked better on the side with a smaller gate than the bigger gate,
but this could be linked to the fact the ground slopped, and may be not totally straight post...
but it works great as this is one that is opened multiple times a day.

We started small, one side at a time, adapting to an uneven terrain and lot.
On the first side, we spaced the board 5 1/2 inches apart (using a 2 X 6 for spacing),
 before getting the puppy,which is way too wide for a small dog,
 but perfect for Black dog (wrong reference point!)


So we added some sturdy mesh to the fence and it seems to hold everybody nicely!

While we were building this side, we put up some temporary fencing on the other side.
Once again we built it a little at time, but for this one, we used a 2 X 4 for the spacing,
it is a lot closer (by 2 inches!) but still too wide for a slim puppy.


So once again we added some mesh, after painting.
The angle we used might seem unexpected, but I was uncomfortable building a fence just under
my neighbor's basketball play area, I had vision of kids dunking and falling on post/fence
and getting hurt! So we went with a diagonal fence.
It turned out to be perfect, the basketball never falls in the yard 
(no danger of letting the dog out to get the ball) and
 I can see every part of the backyard from inside 
(otherwise we would have had a hidden corner!)


We still need to add some flagstones under this gate, each time it rains, it gets all dirty!
The best part, we managed to finish before the arrival of the mosquitoes
(OK just by a couple days, but still),
now the puppy can go outside without us, which means less biting for us!
(they should make for people some of those tick/mosquito monthly repellent spray!)

Happy day!


Monday, June 25, 2012

swimsuit for dolls

Is your doll ready for the beach?
or just sun bathing in the grass like ours?


After building the Adirondacks chair, I could not help it
and I sewed 3 swimsuits for the girls....
I know, I am crazy, I cannot and do not want to change!


Don't they look lovely in their "new" swimsuit,
with their towels and pillows?

I say new loosely because I started with a few of Miss C.'s old swimsuits!
It is recycle at its best, nobody wants to get an used swimsuit,
so I felt quite comfortable cutting through them.


Here is what I started with 3 1/2 swimsuits and a summer dress.
I was inspired by this cool tutorial from the My Froggy Stuff,
I changed a few things here and there,
but if you are interested in making some, go check it out!
The other thing I want to make clear is this is not the best sewing I have ever done,
probably the opposite, as fabric was limited and not everything matched up perfectly,
but the outcome turned out great and Miss C. is very pleased!


For the Tinkerbell suit, I started by taking apart the original suit carefully,
and pinning it on the doll for a proper fit.
Then I stitched the sides, with right side together.

I turned under the sides (from the under arm to the chest), and top stitched them.
I also folded under the bottom and stitched the crotch (it should have been done on the inside!)
I hand stitched the straps to the top, they were also recycled from the suit.
I was able to keep some of the ruffles and most of the pictures on the front and back.


This second swimsuit is a 2 piece, the top started has a bottom.
I just cut the suit at the side seams and used the back upside-down for the top.
The sides were already finished, so I folded over the top to make a casing,
and the bottom to finish the edge.

Then I stitched the back seam, and used some cord from another swimsuit
to make a tie around the neck: a very easy and fast swim (or regular) top.


For the bottom, I used the pink suit to get a rectangle of fabric,
using the top edge to skip a step, fold under the bottom part,
and stitched the crotch.
I also used the top of the bikini to make a head piece,
no sewing required, I just remove 1/2 of the bikini top,
and knotted around her head, a perfectly match accessory!

Since her suit is 2 piece, and the top can also be a regular top,
I made her a little cover up skirt, using part of the summer dress.
I cut half of the bottom tier of the dress,
I folded under the top and stitched to make a casing,


then I added an elastic and stitched the side to finish the skirt.
The bottom edge was already finished with a cute lace.

For the last swimsuit, I followed almost exactly the tutorial of My Froggy Stuff,
except that I did not have enough material out of Miss C.'s suit for the lining,
so I used some actual swimsuit lining that I had around.
This is the only time where I had to use something else than the old suit,
so not bad at all.


I did a little stitch at the neck line to decorate this otherwise simple suit.
I once again reused the strap of the suit and did not make them
as recommended in the tutorial.

So here they are, the 3 girlfriends
enjoying a sunny day!


Happy sewing!


A Crafty Soiree

Christmas crafting: it was a busy month!

This December was very busy with a lot of crafting, sewing, quilting, baking. I found it easier to share on Instagram (not something I thou...