Showing posts with label scout. Show all posts

Thursday, December 31, 2015

a year in review

This year was a pretty good year for us as a family
and for me personally,
work has been going well with interesting prospect for the future
(more research on vaccines for developing worlds),
but this little blog had a mid life crisis....
Hopefully it can get over it without a sport car!
Now let's review this year top 3 favorites:
My kitchen remake from a few years ago was #1,
more specifically this post here.


It is still actually a work in progress since we just finished adding a back-splash,
I will blog about it later next year....
#2 was again as my brownie vest, everyone's favorite:
here for the tutorial

.

Oh I do miss sewing for the dolls!
#3 was this cute plush macaron I made for Miss C. as a sweet treat
to get over her new braces.


My favorites for this year were:
the outdoor couch, the entryway storage and the sewing configuration book.


For the nest year, I see a few more house projects, like redoing the coffee table
(I received the wheels for Christmas),
some sewing of course, and probably a few odds and ends things,
the usual really!

Thank you for reading.

Farewell 2015.

Tuesday, December 31, 2013

a year in review

This is the time of the year where I look back at my work
and check for favorites, yours and mine.

Well this year, just like last year, it has been all about dolls!


The girl scout vest remains my most popular post,
I enjoyed celebrating Mardi Gras, Valentine's day, Earth day,
Fall/Halloween and Winter sports.


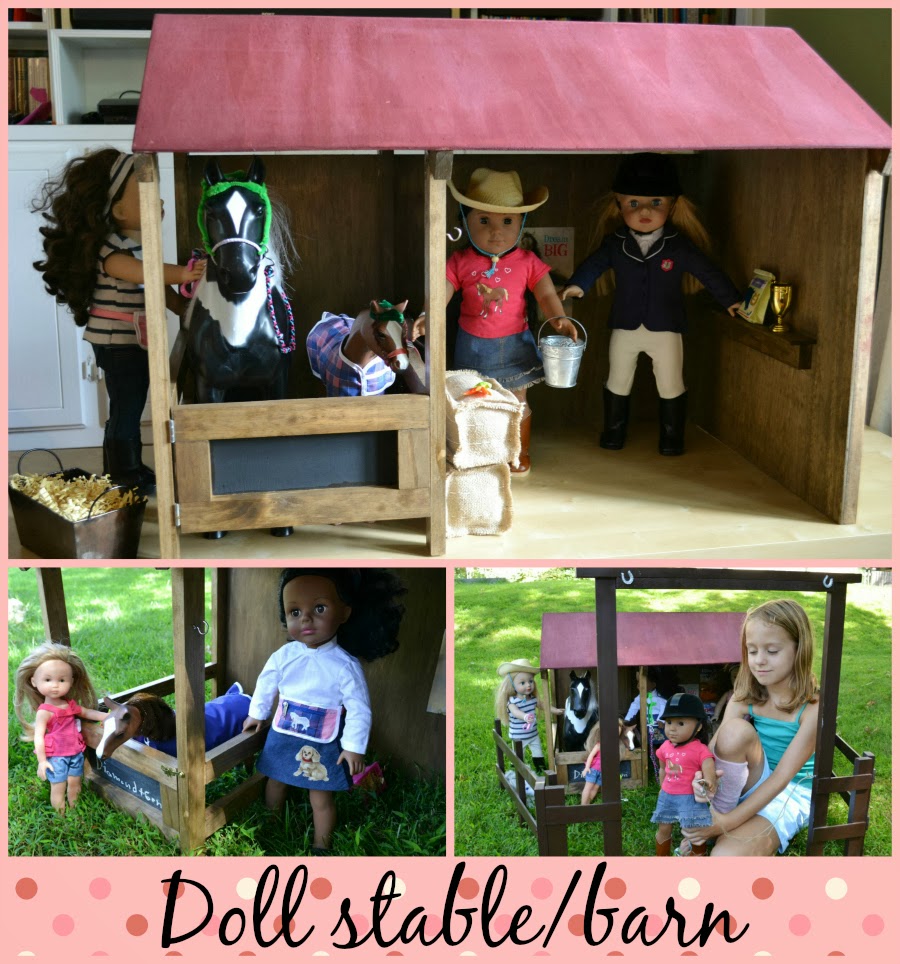
Another great moment was building the stable/barn for Miss C.'s bday,
it works perfectly with the ranch I made the previous year.

I managed to do some non-doll related sewing,
quilting remains one of my favorite activities!


Summer treats, Iron and dress, Sewing machine,
Tree skirt, mini quilt, Love pillow.

And I could not finish this year review without including the total remake
of the kitchen....I know I started the previous year but it was completed this year!


Actually completed might not be totally right,
I am thinking about adding a back-splash,
I guess we shall see what happens next....

Happy day!

Saturday, December 8, 2012

making ornaments with the Brownies

After the semi-disaster of the butterflies brooches,
I was eager to revisit sewing with the Girls scouts.
Making ornaments seemed like the perfect occasion to start anew.
With about 30 minutes for our craft, I came up with an easy project that
everybody would succeed at making, no matter the ability.
So here are the ornaments we made:


Before the meeting, I cut a lot of stars,
luckily I have a die cut for it!
I wanted to make sure we had enough color to please 
all the girls, there is no crying in Brownies!


After choosing 3 stars (at least 2 different colors)
we made a star sandwich:
the middle star is slightly twisted and sticks
out of the 2 other stars that are perfectly aligned.
Then we stitched around the layered stars with 
a simple running stitch, keeping everything simple!
At the top, we made a loop to hang the ornament.

This project was a total success,
all the girls made an ornament,
and they are turned out beautiful!


Happy crafting!


Sunday, June 10, 2012

Girl scout: rock the mall

Yesterday, Miss C., 2 Brownie friends, their moms and I went to DC 
to celebrate the 100th anniversary of the Girl scout,
it was crazy! (and hot!)


See the people behind Miss C.? Well they expected 250,000 girl scouts!
We did the Caesar version: "veni, vidi, vici" in a hour
and then we went to the museum!
It was as crowded but it was cool!


And finally, we stopped at Paul, the French bakery
for sustenance and rest,
perfect for the girls and their moms!


I believe these 3 girls will have great memories of the event,
may be not so much of the singing or dancing or scout,
but definitively friendship!


Happy day!


Friday, May 11, 2012

butterfly brooches for Mother's day

I have been looking around for a easy and fun project
to do for Mother's day with the Brownies.
There are quite a few options out there,
but the one we went for is a butterfly brooch made out of felt.

(mine on the top, Miss C.'s on the bottom)

They are pretty and a good project for the girls,
perfect to learn to sew a simple stitch.
I used this tutorial from Bugs and Fishes.
I prepared kits for my brownies:
2 precut butterflies with a brooch back already attached.


The same blog has another version of the butterfly brooch,
with more details, prettier and a lot less simple,
it would be prefect for older girls,
who could do all the cuttings and sewing without help,
or younger girls with more help.


I will not show you how they turned out,
it was a lot harder than I expected....
(I am used to crafting with Miss C.)
but all the girls worked hard and had a great time.
I hope their mom appreciate all the hard work they did!

Happy sewing!


Monday, March 12, 2012

doll brownie vest

The Brownie vests are made for Miss C.'s doll troop
are based on her own vest.
I simplified a few details, like her badges,
but I kept the shape and binding around the vest.


here is the pattern I made for the doll vest: Google doc link,
it is a one piece pattern with only shoulder seams.

I made the vest a few different ways
from true to the original to fast and almost no sewing.

Let's start with the one with binding.


First I cut the pattern on the fold and cut some binding (1 inch wide on the bias).
If you can find the binding in the same brown that your fabric,
 you can skip that step!


I folded and ironed the binding, first in half, then each side in half again,
it is very narrow, it is best to do it without steam to protect the fingers!


I bound the arm holes with the binding, enclosing all the raw edges,
stitching both sides at once.
I opened the binding and slipped the edge inside the binding,
sewing both sides.


With right side together, I stitched the shoulder seams
with a straight stitch and zigzagged the edges.


I applied the bidding to the front and neck region like I previously did 
on the arm holes.


And then I finally applied the binding to the bottom edges.


The last step is to turn inside the raw edges of the binding and
hand stitched them.

The next version is a lot faster:
I skipped the binding,
and just turned inside a little of the fabric and zigzagged the edges.


It is not as neat and precise but it is really fast.

And for the last and fastest version,
I used felt and just stitched the shoulder seams.


It is easy enough that children could make their own for their doll.
The pattern does not fit on a precut piece of felt.


After the vests were made I decorated them to resemble
Miss C.'s own vest.


The badges are made of felt, just triangles.
I copied the general colors and placement
and whipped stitched around them with brown embroidery floss.


The numbers are embroidered in white with a back stitch (3 threads)
and surrounding box in brown (1 thread).


I also stitched the ribbon with the 2 insignia: the flower and the elf.
The contour is back stitched in brown (1 thread),
the flower is made with lazy daisy stitch in orange (2 threads)
and the elf is also made of different size lazy daisy stitch in gold.
The 100 year insignia is made of felt with 100 embroidered in green (1 thread)
in back stitch and lazy stitch.

I still need to find a small American flag,
I hope I can find an small iron-on patch at the fabric store,
it is just too hard to embroider 3 of them!


Updated version:


I managed to find a mini flag at my local fabric store "G Street",
now the vest is complete,
well it could use a few more patches to match Miss C.'s progress!


Of course the same vest can be made in all the other girl scout color:
blue for Daisy, green for Junior, tan for Cadette/Senior/Ambassador.

Happy sewing!


Sew Chatty

doll brownie troop

Today it is the 100th anniversary of the Girl scouts.
My daughter is a brownie, she was a Daisy when we lived in Ohio,
and just loved it.
After we moved, I asked her what activities she would like to do:
art, dance, gymnastic, karate...
The only think she wanted was to be a girl scout again,
so I made it happen,
and when I say I, I mean it, I am the co-leader of her troop,
there was no troop at her school.
While I am still new at this and it is still a work in progress,
she got exactly what she wanted: many girlfriends and fun activities.


 I thought it would be great fun to make her dolls
some brownie outfits so that she could have her own brownie troop!
Which meant 3 dolls: 3 outfits!
I went for a simple skirt and vest.


The skirt is a wrap around skirt made of brown twill, lined with quilting cotton
(it is reversible), the pattern is from You Can Make This, it is free and easy,
just basic sewing, the skirt can also fit some stuffed animals!

The vest is also made of the same brown twill,
I made up the pattern, based on her actual vest.
I will share latter the pattern and how I made the vests.
It is here.


I still need to find some small American flags for the vest,
but overall Miss C. enjoys her troop!

Happy Anniversary Girl Scouts,
and happy sewing!


Friday, March 9, 2012

cub scout memorabilia cushion

My son loved being a cub scout when we lived in Ohio,
he had a great time, did many cool activities (like this ornament),
learnt lots of stuff, including shooting with a BB gun and a bow and arrow,
(big deal for a boy with an anti-gun mom!)
went to cub world for week long camps,
proudly walked on parade, shaking more hands than a politician on campaign!
And of course made great friends.

But when we moved to the DC area, he was not able to find the same thing,
 the same camaraderie, so after trying for many months to fit in, and long camping week ends,
he decided to leave the program and find somewhere else what he was looking for.


Brick Master had earned lots of badges during those years,
all held a lot of neat memories,
so I unstitched them from his red vest 
(of course they were stitched, not just ironed on!)
and make a memorabilia floor pillow with them.
I have not yet touch his blue shirt just in case he changed hid mind,
but I think soon it will be time to add these too.


I used a boxed edge pillow form 24 inch X 24 inch.
The pillow top where the badges are stitched is made of drop clothe,
the side and pipping are made of scout fabric,
and the bottom is a cotton from JoAnn with a camping/outdoor theme.
(same fabric then I used for Brick Master's pouch for vacation)
I did not put a zipper in, just some Velcro on one side of the pillow.


My son really enjoys his pillow, it perfect to seat on
or just read.


And in case you have wondering about the activity that was right for him,
the answer is karate!
It seems to provide the same joy, friendship and character building that cub scout
was for him before.
He is already a green belt and dreams of purple or blue!


(the order is: white, orange, yellow, red, green, purple, blue, blown, black)

Happy sewing!


Christmas crafting: it was a busy month!

This December was very busy with a lot of crafting, sewing, quilting, baking. I found it easier to share on Instagram (not something I thou...