Tuesday, December 11, 2012

embroidered ornaments

Last summer ( I mean summer 2011), the kids and I spent
a month at my parents, enjoying the French lifestyle
and visiting family.
During some of the downtime,
I did some cross stitching.


My mom and I used to spend a lot of time during
the summer months embroidering.
So I stitched a few little embroideries for the winter
to make as ornaments.


Well Christmas  came and went last year
and I totally forgot about them.
But this year I remembered and finally treated them properly.


They are fairly traditional,
after all who doesn't love deer at Christmas time?
For the back I used some Liberty of London,
it is well know that I have a thing for linen and Liberty!


Happy Sewing!


Saturday, December 8, 2012

making ornaments with the Brownies

After the semi-disaster of the butterflies brooches,
I was eager to revisit sewing with the Girls scouts.
Making ornaments seemed like the perfect occasion to start anew.
With about 30 minutes for our craft, I came up with an easy project that
everybody would succeed at making, no matter the ability.
So here are the ornaments we made:


Before the meeting, I cut a lot of stars,
luckily I have a die cut for it!
I wanted to make sure we had enough color to please 
all the girls, there is no crying in Brownies!


After choosing 3 stars (at least 2 different colors)
we made a star sandwich:
the middle star is slightly twisted and sticks
out of the 2 other stars that are perfectly aligned.
Then we stitched around the layered stars with 
a simple running stitch, keeping everything simple!
At the top, we made a loop to hang the ornament.

This project was a total success,
all the girls made an ornament,
and they are turned out beautiful!


Happy crafting!


Wednesday, December 5, 2012

little framed owl ornaments

Here are some cute owls ornaments I made: 


So cute, right?!


During Thanksgiving break, I was able to do some hand embroidery,
It is not my first pattern from Mollie,
I embroidered the tea cup, the gold fish and the cupcake using her patterns.


To set up those cute little owls as ornaments,
 I decided to not use a mini embroidery hoop,
but to make my own frame out of wood veneer.


To make the frame I used my sizzix die cut machine and cut 2 frames,
one of wood veneer and one of cardboard.
The veneer is not sturdy enough to stand on its own,
so I glued it to the cardboard with wood glue.
To hide the white cardboard (recycled with boxes)
I used some stamping ink to give the back a similar shade,
I also did that on the edges of the frame, inside and out.


Then I cut a piece of cardboard, larger than the frame opening.
I also cut my little owls, making sure that there were a lot of space around them.
The owls were started and ironed, making it easier to work for the next part.


I them wrapped the little owl around the cardboard,
folding the corners and attaching it all the back
with shipping tape!
(I know, not very classy but effective!)


More tape was used to attach the embroidery to the frame
and some twine to the back of the ornament.


Now to make the back more presentable,
I hot glued a square of orange/brown felt.


 and there you have it,
cute little ornament in wood frame!


Happy day!


Tuesday, December 4, 2012

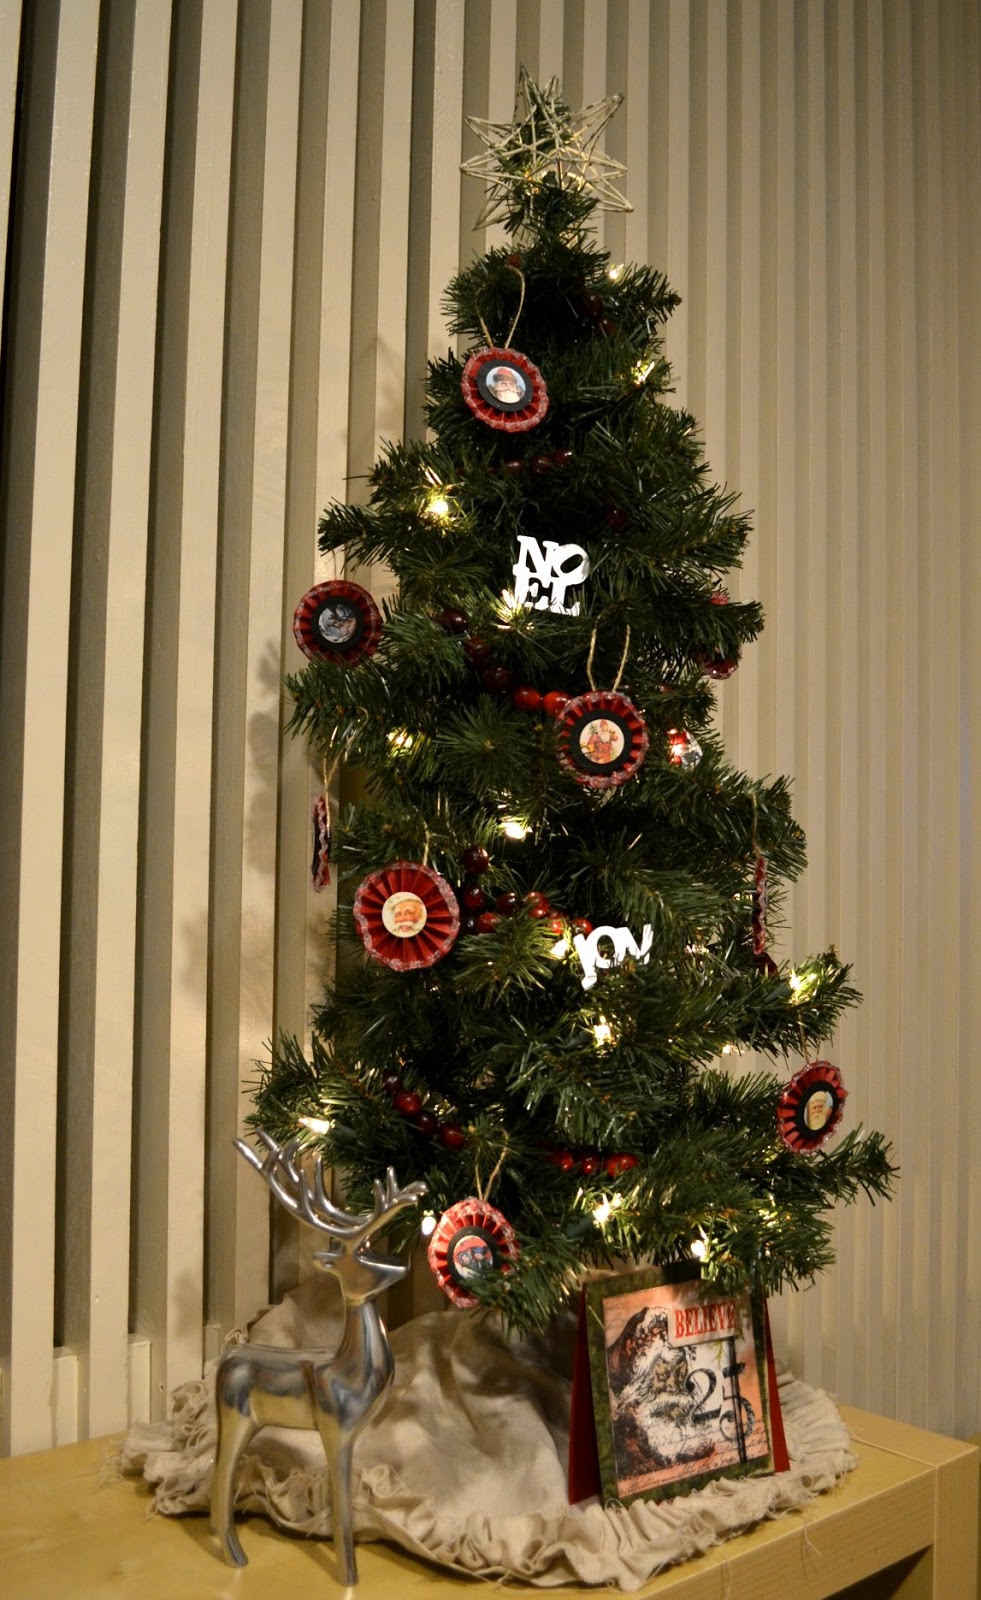
little decorated Christmas tree

We have not yet purchased our Christmas tree,
but I have already decorated the little tree
that sits on the side board behind the dining room table,
our mantel of sorts.


I made all the trimmings, except for the star at the top. 
I was inspired by this advent calendar tutorial from the Graphics Fairy-DIY.
I used the images to make simple rosette ornaments,
decorated with some glitter.


I also sewed a few years ago a sweet ruffle tree skirt,
inspired by this tutorial from Miss Mustard Seed,
I made it out of osnaburg, it is much lighter than canvas,
so it does ravel a lot but it still looks nice.


Miss C. and I strung cranberries on dental floss
to add more red to the tree, I had never done it,
it was something we both enjoyed!


With a die cut machine, we made some silver words (Noel, Joy)
that we placed throughout the tree,
and we called it good.


Now we need to get a big tree to decorate with ornaments
we collected over the years,
no theme or fanciness,
we are an everything-goes-Christmas-tree family!

Happy day!

The Graphics Fairy

Sunday, December 2, 2012

mittens of many uses


Yesterday I showed our "heirloom" advent calendar,
 I would like to demonstrate the many use of mittens through the house!

Besides the advent calendar, my other favorite way is this one:

more details here.

Because the mittens can be made in any color that suits your fancy,
it can fit just about any decor.
Here are a few color ways I used for making mittens, besides the ever popular red!

1234, 56.


And finally it is perfect for just about anything!


Will you be making any mittens this Christmas?

Happy sewing!


Saturday, December 1, 2012

it is advent calendar time!

While I have not been posting regularly
(as if it ever happened!)
I have been busy getting ready for Christmas.

Last year, I ran a cool series that I called 
"the 12 days of mittens".
I had fun finding ways to use mittens to decorate the house.

The best one was the advent calendar:


You would think that which such a calendar,
we would be using over and over,
(considering the time it took me to make all those mittens!)

Well here is a reality check, it is LEGO all the way,
with not one but two calendars,
I am sure you can find which one belong to whom!


If you are interested in making your own mittens,
I made 24 mittens using this technique
(here is the simplified version)


1, 2, 3.


Tomorrow, I will review the "many" uses of mittens!

Happy sewing!


Monday, November 19, 2012

still working on the kitchen

While my family's visit was short,
we were able to do a little more work in the kitchen before their departure.
we covered the edges and seams of the upper cabinets addition with molding.


While it still looks very patchy,
it is much improved over the original!

Here is what we started with, and the midpoint:

The kitchen update was inspired by this tutorial by Remodelando la casa.
We used another one of Cristina's idea to improve the bottom of the cabinets.


We attached 1 X 2 at the bottom of the cabinets,
and hid the seams with the same molding that we used on the top,
but up-side-down.
This accomplishes a few goals:
- it makes the cabinets look a lot more finished
- it repeats the molding, making it symmetrical
- it creates some space under cabinets to add lighting
-it aligns the microwave with the cabinets

So here it is, prettier
but still with a lot of work to be done...


it will just happen slowly,
probably one week end at a time!

Happy day!


Wednesday, November 14, 2012

a simple shoe bag

 My sister's Birthday was a few days ago,
and as usual I sewed her something for all of her travels.
This year new addition: 2 shoe bags.


here is the high heel version


and here is the sneaker version, together they are perfect for traveling,
keeping everything nice and organized.

Previously I made her 2 different versions of lingerie bags (here and here),
2 different versions of make-up bags (here and here)
and a laundry bag.


Let's not forget the lunch bag, the little basket and the little dumpling!
What can I say, I like sewing for my little sister!
and she likes my stuff, a perfect world...

And considering what she did for me this week end,
I feel like I will be owing her:
She picked up the perfect Christmas present for me
and got it signed, here is the proof:


I will get John and Sherry's book!
She spent hours waiting in line for me,
yep I am a lucky girl.

Bon anniversaire, ma soeur!


Sunday, November 11, 2012

updating the kitchen part II

Not only did my parents help me with the upper cabinets in the kitchen,
they also helped me with the island.
It is a nice size, at almost 60" wide,
but the front was very plain.
Besides the countertop, it is the largest surface in the kitchen,
it is pretty much the first thing you see when you enter the room.
So we thought of ways to dress it up.
Once again after finding images from blogs,
especially this tutorial from KrisKraft,
we were set to go, with my mom as the design consultant, my dad as the wood expert 
and me as the helper/translator!
Here is what we came up with:


I know, right now it looks like an old station wagon wood paneling part,
but once it is patched up, sanded, caulked, primed and painted,
it should be quite a statement for the kitchen!
Here is what we started with:


There was no baseboard, just a quarter round,
and some poorly attached corner pieces (not made of wood)
that did not match in color the stained plywood.

So we started by taking everything off, and we renailed the back to the island.
Then we glued and nailed some proper baseboard, we kept it simple,
I like straight line, simple design.
We installed some corner trim, wider than the original, with a little design detail.

After that, we used 1 3/4" wide lattice that we glued and nailed to the island 
to form a square and rectangle pattern.

A similar design was used on the sides of the island except there is no square,
just rectangles since we could not keep the same spacing on the sides!

The after is still missing one piece of wood on the side,
there was a mistake at the store, one piece was 1 1/2" instead of 1 3/4".

So now that I am left on my own, I need to finish all the details.
Working alone might take longer, especially with the help of the puppy,
everything is just so interesting to her,
she will probably gain some more white on her black and white coat!
This will not be the last time!

Happy day!


Tuesday, November 6, 2012

a visit and kitchen update

It had been 4 years since my parents visited us last.
While I was working for some of the time of their visit,
I did get to take them around a few times,
we went downtown DC of course, to Mount Vernon (Washington's house),
to Antietam and Gettysburg (civil war) and to Georgetown.


No family visit would be complete without some building and/or sewing!
My mom helped me finished some curtains (I truly dislike hemming curtains),
somehow she has been doing it for me in all my houses...
I know, it is very bad, I am a little ashamed,
but she told me she has been doing it since she was a kid.
She did it for my grandmother who was a country seamstress,
my mom hemmed for her pants, dresses and curtains!
Thanks again Maman!

My dad helped carry out my vision for updating the kitchen.
I showed him some pictures and ideas,
and we went to work, with my mom as the design consultant, a family affair!
I think it is going to be great, once I finished all the details!
My dad did most of the building, I was just the helper,
it was interesting to see someone with experience working,
I learned a few things, and it also confirmed my ideas
 that the most important part is to get started and
not to always look for perfection!
Now they are gone and I need to feel in the holes,
to caulk the edges, to prime and paint.
Yes it is going to take a while, but it is totally worth it!
Wanna see what we worked on?


Yes it is going to be good!

Happy day!


Saturday, November 3, 2012

it was a fun Halloween

Halloween turned out nicely,
even after a week end of getting ready for the storm,
and waiting 2 days wondering how things would turn out.
Well there was a leak in the roof and the sump pump got tired (and the basement moist!),
but we kept our power and no tree felt down,
so we did OK, I guess having a few trees cut earlier in the fall paid off!

The kids were able to enjoy their trick-or-treating outing,
Brick master went for the first time with his friends without any adult,
he is growing up!


He wore his favorite knight costume.
At the renaissance fair this year, he purchased a new wooden sword,
he is now fully equipped with a dagger, a sword, a shield and a helmet,
all of them purchased at renaissance fair, one item at a time!
If you are wondering, yes we are those kind of people
and yes he has a passion for History and weapons, of course!
I made his "flag" a few year ago before redoing his costume
and switching his color!

Earlier, while I posted the dolls'Halloween,
I mentioned that Miss C. wanted a werewolf costume.
I made her a warm one piece costume out of fleece and faux-fur
using pattern McCall 6106, I had used it before for her Kangaroo costume.
With her dad, she worked hard on making a mask.
Mon Cheri enjoys working with leather, so they chose that medium for the mask,
it looked really good until the puppy got hold of it and ate it!


There were a lot of tears, it was unfixable and we did not have enough time
to make a new one.
So Miss C. decided to go as Katniss, the heroine of the Hunger games.
(it must be a cultural phenomena as she has not read the book or watched the movie!)

Luckily we had pretty much all we needed to dress up,
a good thing since we had no time left (the dog ate the mask Halloween morning!)
She wore her boots, black leggings and shirt,
her brother's jacket inside out and his belt,
and I braided her hair on the side, I printed out a picture of the mocking jay pin.
She used her own little wood knife, Mon Cheri made her a bow using a stick from the back yard.
Her outfit was complete, it must have worked,
people knew who she was!

Oh she was fierce!

Happy day!

Christmas crafting: it was a busy month!

This December was very busy with a lot of crafting, sewing, quilting, baking. I found it easier to share on Instagram (not something I thou...