
Once again I spent a little too much time preparing Miss C.'s Bday party!
Please tell me I am not the only one.....
I guess I have a little too much fun making stuff!
This year theme was the Eiffel Tower,
what is not to like, right?

last year goody bags were simpler:
homemade-goody-bags

This year I went with a more purse looking bag,
A very girly version of messenger bag.
This one is the simple version,
tomorrow I will explain the extra steps for the piped version.
The fabric I used is Premier Print Franch Stamp Dossett Grapevine
from Fabric.com, it is a home decor fabric, so it has more body than just a regular cotton.
List of cuts:
For the body 8" x 13.5": 2 in print, 2 in lining, 2 interfacing.
For the flap 9" x 11": 2 in print, 1 interfacing.
For the strap: 2 strips of 2.5" of lining fabric
1 strip of 2.25" of interfacing
1 strip of 3.5" of print
The length of the strap depends on the size of the child,
mine was about 26", half the width of the home decor fabric.

Let's start with the main body.
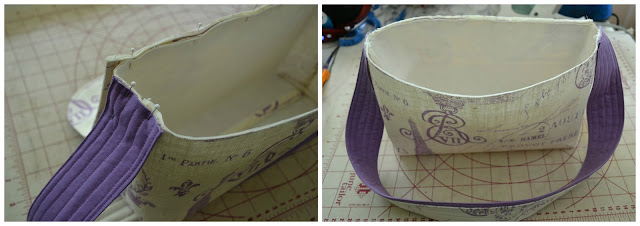
First I interfaced the 2 prints, then I stitched with a 1/4" seam allowance the 3 sides of the rectangle
(bottom and sides), making sure the tower is right side up.
I ironed all the seams opened, pinched the corner so that the seams align.
I marked a stitching at 1.5" from the corner, the line is 3" long.
I stitched that line and cut off the excess fabric, about 1/4" away.
I turned the bag right side out, and pressed it.


The lining is now complete, and remains inside out.
Let's work on the bag flap.
I ironed the interfacing to the top part of the flap, then using a round object,
I traced 2 rounded corners and cut out the corners.
With the other flap piece, right side together, I stitched on the 3 sides of the flap.
I clipped the corners, turned it right side out, and pressed it carefully.
I top-stitched all around with a scant 1/4".

For the strap, I ironed on interfacing to one lining strap, and stitched both of them together on the 2 long sides. I turned it right side out, pressed it and top-stitched both sides.
With the print strip, I stitched it to itself wrong side together, pressed the seam opened making sure it is centered in the middle, because it is applied to the lining,the back side will not be seen.
I centered the print band on top of lining strap, and stitched close to the edges on both sides.
To add strength to the trap, I stitched the strap 3 more times, on the print.


Happy sewing!

This year I went with a more purse looking bag,
A very girly version of messenger bag.
This one is the simple version,
tomorrow I will explain the extra steps for the piped version.
The fabric I used is Premier Print Franch Stamp Dossett Grapevine
from Fabric.com, it is a home decor fabric, so it has more body than just a regular cotton.
List of cuts:
For the body 8" x 13.5": 2 in print, 2 in lining, 2 interfacing.
For the flap 9" x 11": 2 in print, 1 interfacing.
For the strap: 2 strips of 2.5" of lining fabric
1 strip of 2.25" of interfacing
1 strip of 3.5" of print
The length of the strap depends on the size of the child,
mine was about 26", half the width of the home decor fabric.

Let's start with the main body.
First I interfaced the 2 prints, then I stitched with a 1/4" seam allowance the 3 sides of the rectangle
(bottom and sides), making sure the tower is right side up.
I ironed all the seams opened, pinched the corner so that the seams align.
I marked a stitching at 1.5" from the corner, the line is 3" long.
I stitched that line and cut off the excess fabric, about 1/4" away.
I turned the bag right side out, and pressed it.

Now that the main body is ready,I did pretty much the same thing with the lining,
except that I left an opening at the bottom of the bag,
stitching one side, part of the bottom, stopping (leaving a 3" gap), stitching the rest of the bottom
and the other side.
Once again I ironed the seams opened, pinched the corners and sewed them.

Let's work on the bag flap.
I ironed the interfacing to the top part of the flap, then using a round object,
I traced 2 rounded corners and cut out the corners.
With the other flap piece, right side together, I stitched on the 3 sides of the flap.
I clipped the corners, turned it right side out, and pressed it carefully.
I top-stitched all around with a scant 1/4".

With the print strip, I stitched it to itself wrong side together, pressed the seam opened making sure it is centered in the middle, because it is applied to the lining,the back side will not be seen.
I centered the print band on top of lining strap, and stitched close to the edges on both sides.
To add strength to the trap, I stitched the strap 3 more times, on the print.

With all the parts completed, we can now put it all together.
I first pinned the strap to the sides of the bag, centering the strap over the side seams.
Then I pinned the flap, centering it between the strap.
With a scant 1/4", I stitched the flap and strap to the bag.

I placed the entire bag inside the lining, aligning all the seams,
and stitched all around the top of the bag.
I turned it all right side out through the lining opening.
I then slip-stitched the opening in the lining by hand.
The bag is thoroughly ironed with the lining inside the bag.
The edges are pinned together and are top-stitched
all the way around.

And we are done!

Happy sewing!

Wow! What an amazing goodie bag! I bet the girls loved them.
ReplyDeleteKC